Showing posts with label glitter. Show all posts

Saturday, August 11, 2012

Splash Of Grenadine

This week I decided to use "Splash of Grenadine" by Essie along with some accents of OPI glitter "I Lily Love You" on my thumb and ring finger.

I love this polish! It's a cross between magenta and purple, although it showed up pretty pink in the picture The glitter I chose has colorful flecks in it, and it accented the Essie perfectly!


Pin It

Saturday, March 17, 2012

My Julep Maven Experience!

I want to share my Julep Maven experience with you! I found Julep polish while browsing online and decided to check out their website, www.julep.com. When I got to the website I found out that for $9.99 a month you can become a "Julep Maven" and it comes with a monthly box of polish and goodies, plus SO much more. Become a Julep Maven here!!

I signed up and the "American Beauty" Intro box from February was sent to me, and I am so impressed by everything I received. It was definitely an experience, it reminded me of getting a present. The box is so cute and sleek, inside was 2 polishes and cuticle oil, and a polish remover wipe all wrapped in a clear plastic bag with a bow on it! Surrounded by crinkle cut paper shreds in colors that matched the polish! This is totally something I would do, so I just love it. I took pictures of the box and how it came because I am just so impressed.


My intro box came with a gold glitter called "Oscar", a red shimmer called "Glenn", and Julep Essential Cuticle Oil.


I really love the Cuticle Oil, it has a roller ball applicator which is so much better than a brush for daily use. I put it in my night stand and use it every night now! It's so simple to roll it on and hop into bed, and it smells good too.


Overall, I am super impressed by everything Julep!! When you go to the website you can take a Style Quiz and you will get a result of one out of 5 types. I initially got "American Beauty" but after looking at what was sent out for March I feel like I am more of an "It Girl" style. Also, I had a few questions after my order so I emailed Julep and was pleasantly surprised when I got an answer within an hour! They have amazing customer service, on top of amazing product! My next box will be the "It Girl" box and I am so looking forward to it!

I started following @JulepMaven on twitter and within a few days they had a special for half off all polish, so of course I jumped on that deal! Being a Julep Maven you get free shipping so that made each polish $7 with free shipping, such a good deal. I got two from the sale, which of course came in a cute little box with a sample of Hand Cream.


I got "Samantha" and "Anne", both great colors for Spring/Summer! I am going to swatch them soon and will share them with you. Stay tuned!

Pin It

Friday, March 16, 2012

Happy St. Patrick's Day!

I decided to do a fun twist on a french manicure for St. Patrick's Day. I used China Glaze "Gaga For Green" and OPI "Glitzerland" on my tips with Essie Luxeffects "As Gold As It Gets" over the whole nail.


Below is a picture without the Essie Luxeffects "As Gold As It Gets" to show that it looks great with or without the gold flecks.


I hope everyone has a safe and fun St. Patrick's Day!!
Pin It

Thursday, March 8, 2012

Happy Birthday!!

I just celebrated my 31st birthday so of course I had to do a manicure with "Happy Birthday" by Deborah Lippmann! I decided to do a reverse gradient glitter manicure over "Super Bossa Nova" by Essie. I love how it turned out and it's the perfect manicure for a birthday or any time!


"Happy Birthday" by Deborah Lippmann is a super colorful glitter in a clear base, I love all the shapes and color of glitter! "Super Bossa Nova" by Essie is a beautiful bright pink with a fuchsia shimmer.

I started with two coats of "Super Bossa Nova" by Essie, with a base coat under and no top coat. See below.


After the Essie was dry, I started to add the glitter "Happy Birthday" by Deborah Lippmann in layers.  I started by putting a dollop on the very bottom of my nail and carefully spreading it around, not going above the middle of the nail. After the first layer was dry, I added another layer to really cover up the lower 1/3 of the nail, and let that dry. Finally, I went in and touched up any areas in the lower 1/4 of the nail making sure it was covered solid with glitter. After all the glitter was dry, I covered it with a top coat as seen below! This picture was taken in indirect sun light.


This picture was taken in indirect artificial light. This picture makes the pink look more coral/red but it's really bright pink! Refer to the first picture of the Essie polish alone above.
Pin It

Saturday, March 3, 2012

Easy Cheetah Manicure Tutorial!


Above are the supplies I used to my manicure, the polish I used was , White "White On White", Turquoise "Flyin' High", Purple "Spontaneous", Pink "Purple Panic (Neon)" all from China Glaze, "Black Onyx" from OPI, and "Glitter Hologram" from Art Club. You also need a base and top coat.
Here is what you need:
  • Nail Polish in the colors you desire, including base and top coat
  • Paper Plate
  • Orange Wood stick
  • Dotting Tool
  • Paper Towels
  • Old Towel that you can get nail polish on
  • Nail Polish Remover
Steps:

1) Set up all of your supplies, you can use the set-up I have above or however you choose.

2) Put a base coat on clean and dry nails and let it dry.

3) Select the base color that will be under the design, I chose a white polish and used two coats. I let the polish dry in between coats and before I put the design on. See below for example.


4) Take your paper plate and the colors you want to make the spots out of (see the first picture for the names of polish I used), start with one color and put a dollop (about two drops, see TIPS below) of the polish onto the paper plate.

5) Have in mind where you want to place the dots of the first color, take your dotting tool and dip it into the polish on the plate. Transfer that polish onto your nail creating as many spots as you want in whatever shape or size you want. If you are planning on using more than one color of spots, definitely be conscientious of how much space you have.

6) Repeat the above with all the nail colors desired, you can use one color or several colors as I did. See below for an example.


7) Put a dollop of the black nail polish onto your paper plate, start by tracing the edge of the spots with “C” like shapes.  I didn’t trace the spots around completely, but you can do whatever floats your boat. Here is where your own artistic interpretation starts to come in. See below for an example.


8) Then you want to add additional black polish to finish up the look, this is when it really starts to look like cheetah print! Add little black spots and ovals of all sizes, filling up all the area’s that are still empty and balance out the design. See below for example.

9) You can add glitter over one or all of the colors if you like; I used a silver holographic glitter by Art Club over my purple spots. It was easy because the polish has a long skinny detail brush and is perfect for detail work. It ended up making my purple look grey-ish though so I would advise using as little as possible.

10) Wait until all of the polish is completely DRY, this may take an hour or two, before adding a top coat or you will smear your design.  

11) Voilà! Easy at home hand painted cheetah nail art on your finger nails!


Here are some TIPS:
  • Use your orange wood stick to clean up any polish that may get on your skin or cuticles. Use just the stick when the polish is still wet; if the polish is dryer dip it in polish remover first.
  • Make sure each coat is DRY before going onto the next step, this is crucial because if you move too fast your design will get messy and won’t turn out as desired.
  • Try to use crème based or metallic polish as it gives the most coverage with the least amount of coats. I chose China Glaze because it has good coverage and tends to dry faster.
  • When you put the polish on the paper plate make a dollop with about two drops at a time. As soon as the polish hits the air it will start to thicken giving you a limited amount of time to use it. Once the dollop starts to get sticky and stringy don’t use it, just move to a different area of the paper plate and start again with a new dollop.
  • When you put the top coat on try to use one with a thicker consistency like Seche Vite, because you don’t want the brush to drag on the design itself. Put a dollop down by your cuticle and gently push the top coat around the nail, add more as needed.
  • You can get all of the polish and supplies I used at Sally Beauty Supply except for OPI, as far as I know they do not carry it. You don’t have to use OPI though, any black crème polish will work.
  • This manicure takes time and patience so make sure you do it when you have a few hours to dedicate to doing it.
  • Have fun with it! It doesn’t have to be perfect, make it unique and make it your own. :)

Please let me know if you have any questions. I would love to see your own nail art so feel free to share it with me!!
Pin It

Friday, March 2, 2012

China Glaze Polish Haul!


These are by China Glaze: "Gaga For Green", "Dance Baby" and "Wicked Style", all from the Electropop Collection, "Blonde Bombshell" a gold glitter, and "Stone Cold" from the Hunger Games collection.

I got the colorful polish from the Electropop collection to use for nail art and because they are stunning! The gold glitter was on sale for $1.99 so that was a must-have, and believe it or not I didn't have a gold glitter yet! Then comes the one I've really been anticipating, "Stone Cold" is a matte charcoal color, this is my first actual matte polish besides my matte top coats. I'm very excited to try all of these out and share them with you!!
Pin It

Thursday, March 1, 2012

Colorful Animal Print!

Today I did a fun and colorful animal print on white. I used China Glaze for most of the colors, and some Art Club glitter over the purple.
Pin It

Monday, February 27, 2012

Mermaids Dream


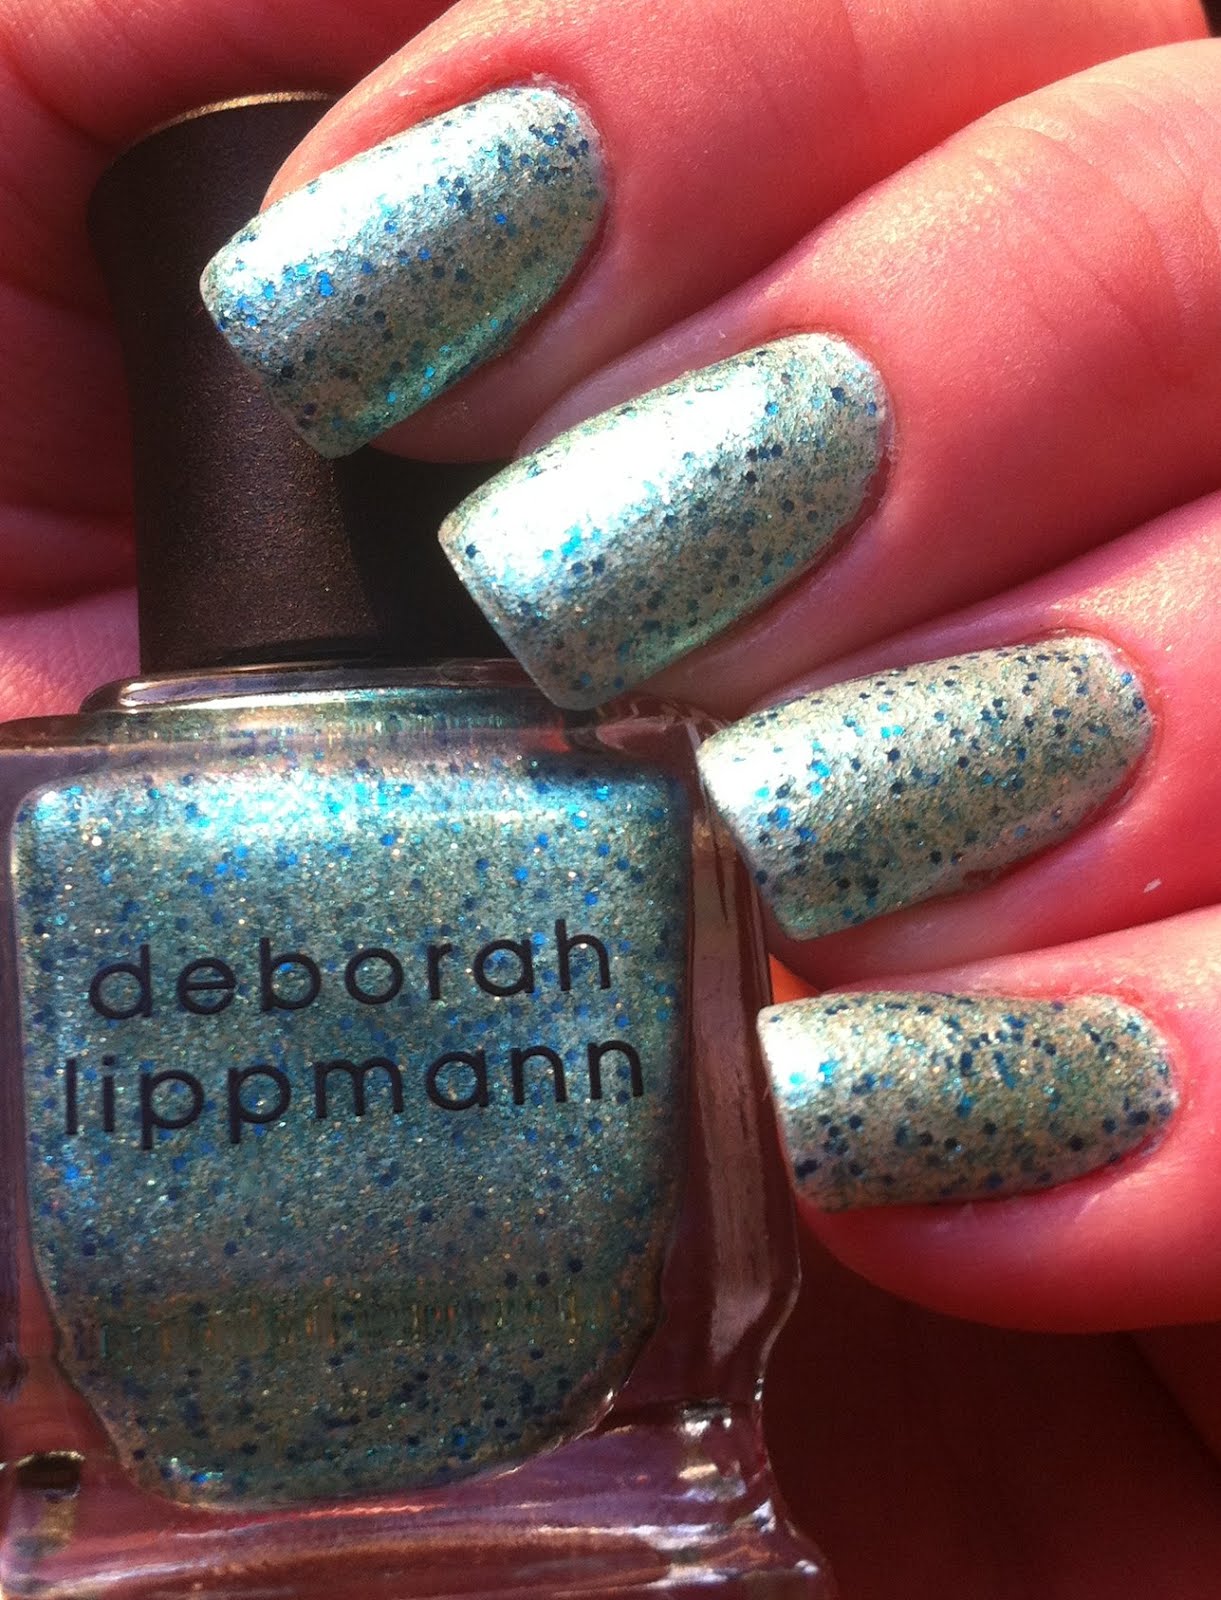
This polish is absolutely beautiful! It's called "Mermaid's Dream" by Deborah Lippmann. This polish is a pearly sea foam green with blue glitter.

I took several pictures of this polish because the more I walked around into different lights I saw how it gave it a different look. No matter what it is just beautiful and stunning to have on my fingers!

These picture was taken in my kithen in bright artificial light:

This was taken in indirect bright artificial kitchen lights:

This was taken in indirect sunlight while the sun was going down (sunset light):

Here is a picture of the bottle in indirect sunset light, this picture really shows off the beautiful glitters:

This was taken in the same indirect sunset light:
Pin It

What Is YOUR Favorite Nail Polish??

Hi Everyone! I want to know what your favorite nail polish is... Leave it in the comments below!

Mine is "Today Was A Fairytale" by Deborah Lippmann, with "Forget You" in a close 2nd place! I love her glitter :)

Pin It

Saturday, February 25, 2012

Freshen Up Your Manicure!

I added a line of holo silver glitter along with a shiny new top coat to freshen up my manicure!
Pin It

Thursday, February 23, 2012

Black French Tips

I caved and went and got acrylic nails today after sadly breaking a few of my natural nails. They look amazing though! I got black french tips with "Snow Globe" by China Glaze on my accent finger.
Pin It

Sunday, February 19, 2012

Polish Haul!

Lately I have been on an Essie binge, I love their polish and they have been around since 1981 so they have a great formula and all their polish goes on nice and smooth. I have been so excited to get the Luxeffects collection and I can't wait to test them out and show you. I also picked up their base and top coats to try out as I just ran out of my Butter London Base and Top... So far so good!!

Here are the Essie Luxeffects, "Shine Of The Times", "Pure Pearlfection", "A Cut Above", "Set In Stones", and "As Gold As It Gets".

The top row is two top coats, "Good To Go" and "Matte About You", the base coat is, "Fill The Gap". Bottom row are a few colors I picked up, "Absolutely Shore", "Dive Bar", "Cocktail Bling" (in previous post), and "Borrowed and Blue". Pin It

Saturday, February 18, 2012

Cocktail Bling

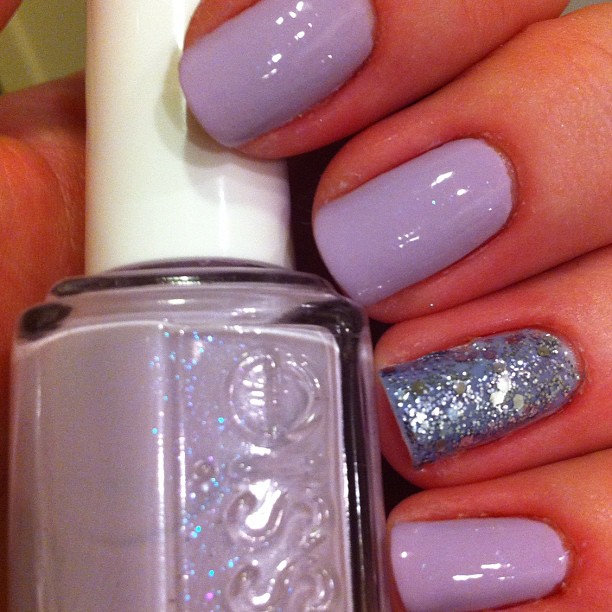
“Cocktail Bling” is a creamy grey-ish purple polish by Essie, and I have “Servin’ Up Sparkle” by OPI on my accent finger.
Pin It

Super Bass

“Super Bass Shatter” with a coat of “Save Me”, both part of the OPI Nikki Minaj collection. Pin It

To Buy Or Not To Buy

“To Buy Or Not To Buy” by Essie, love this creamy purple shade with a hint of blue and pink glitter! Pin It

Nikki Minaj Collection

“Pink Friday” with “Did It On 'Em” on my accent finger, all covered with "Save Me" glitter. These are all from the Nikki Minaj collection by OPI. Pin It

Silver Glitter

Deborah Lippmann “Today Was A Fairytale” over OPI “DS Radiance” and “Lucernetainly Look Marvelous” on my accent finger.  Pin It

Forget You

“Forget You” by Deborah Lippman is a rainbow glitter in a black base. I put it over a coat of OPI “Suzi Skis in the Pyrenees”, so it wasn’t sheer. Pin It

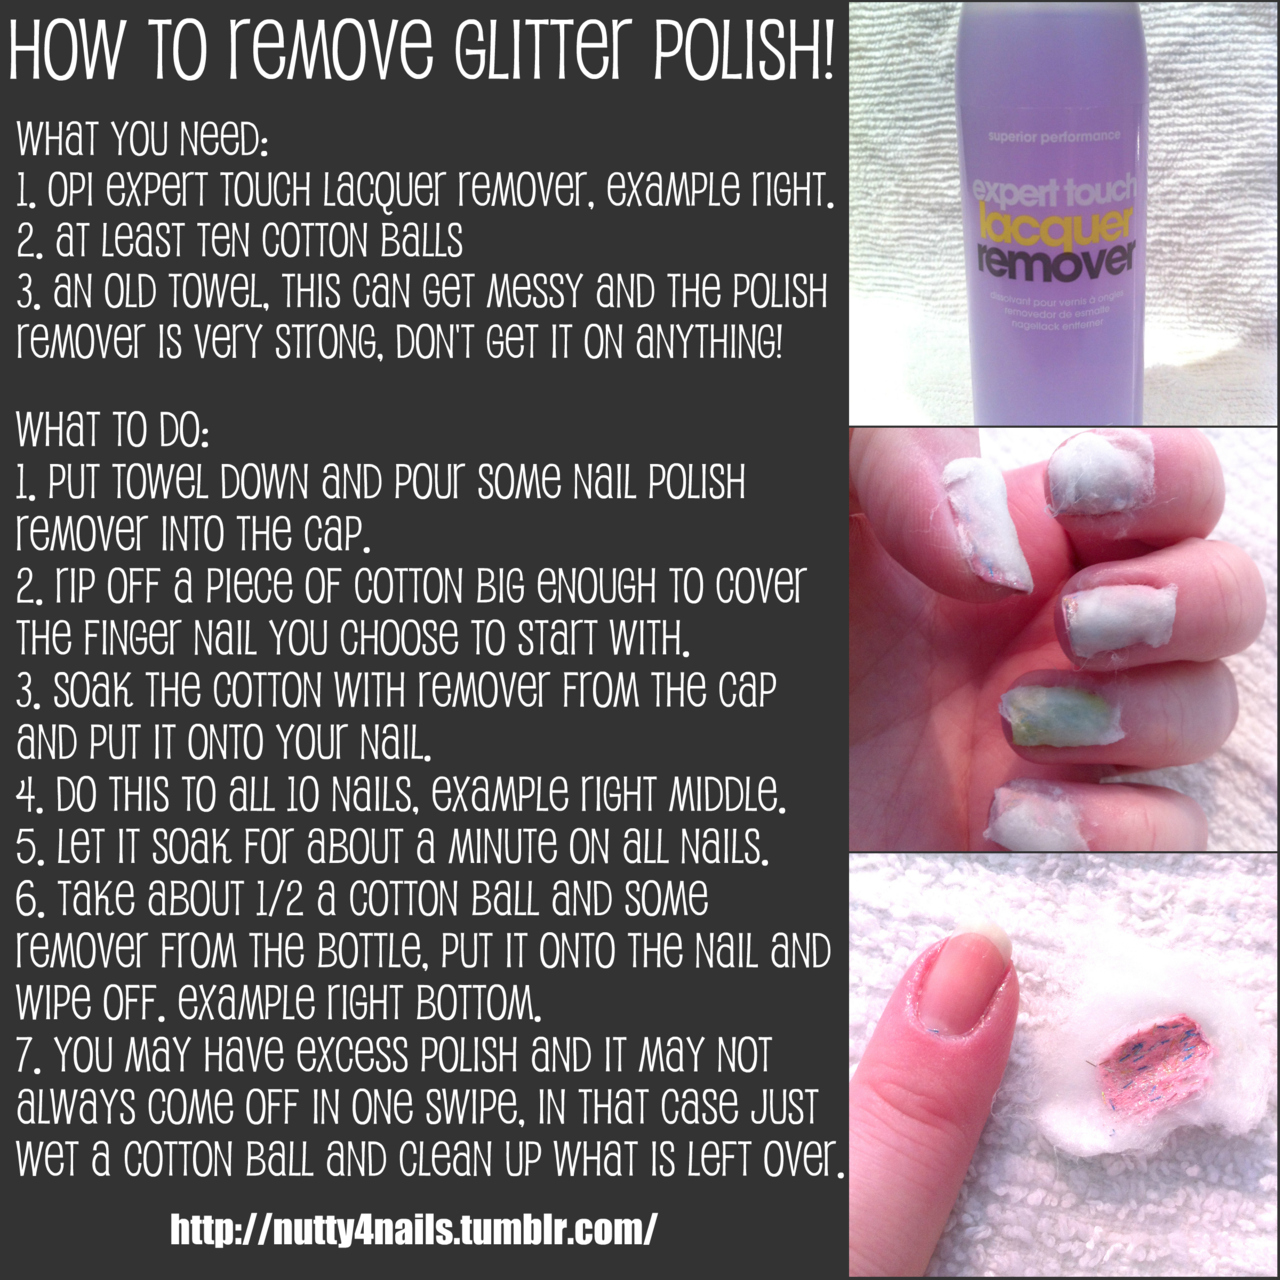
How To Remove Glitter Polish!

I’m always hearing “glitter polish is pretty but SO hard to remove!”… So I decided to make this mini-tutorial on what I do to successfully get all my glitter polish off. Hope this helps!! :) Pin It

Today Was A Fairytale

I’ve fallen in love!! My new favorite polish is “Today Was A Fairytale” an amazing glitter by Deborah Lippmann. I also have a coat of “DS Radiance” by OPI under the glitter, another favorite! Pin It